When you work with medical software like CGM ALBIS, you rarely think about what happens when the hard drive fails. The data is just there: patient records, prescriptions, medical histories. Until one day, it isn’t.
This is the story of how I recovered a completely unresponsive ALBIS installation from a dying SSD. No backups. Years of patient data at risk. And yes, it has a happy ending.
The Problem
The situation was straightforward but terrifying: an old PC running ALBIS medical software stopped booting. The SSD made clicking sounds and froze randomly. Inside were years of patient records. No recent backups existed.
The drive wouldn’t mount. Windows refused to boot. Even connecting it to a Linux system caused I/O freezes. Every attempt to copy files directly locked up the machine.
This is the nightmare scenario: critical medical data trapped on failing hardware, with the clock ticking before the drive dies completely.
Going Into Recovery Mode
The goal became simple: extract every readable byte from the SSD before it failed entirely.
Direct copying was impossible. Windows was useless. The solution required proper data recovery tools and a different approach.
I booted a lightweight Linux Mint XFCE system from USB and connected the failing drive via SATA. Two things became immediately clear.
First, the SSD was dying. It froze randomly, returned bad sectors, and sometimes disappeared entirely from the system. Every interaction with it was a gamble.
Second, ALBIS stores everything in a database folder structure. This meant we didn’t need to recover the entire system, just the data partition. But we needed a block-level rescue, not simple file copying.
The Tool: ddrescue
For dying drives, there’s really only one serious option: ddrescue.
ddrescue -d -n /dev/sdX backup.img rescue.log
What makes ddrescue special is its approach. It copies all readable sectors first, marks unreadable ones in a log file, and allows repeated passes without losing progress. That log file becomes a map of what’s been saved and what still needs work.
Unlike normal copy operations that fail when they hit bad sectors, ddrescue keeps going. It saves what it can, notes what it can’t, and moves on.
Fighting a Failing Drive
The process was brutal. The SSD froze every 5 to 10 minutes. The system would lock up. Sometimes even the USB boot media crashed. Bad sectors appeared in chunks.
But ddrescue doesn’t give up. Every reboot, every reconnect, every freeze still continued from the same log file, slowly expanding the rescued regions.
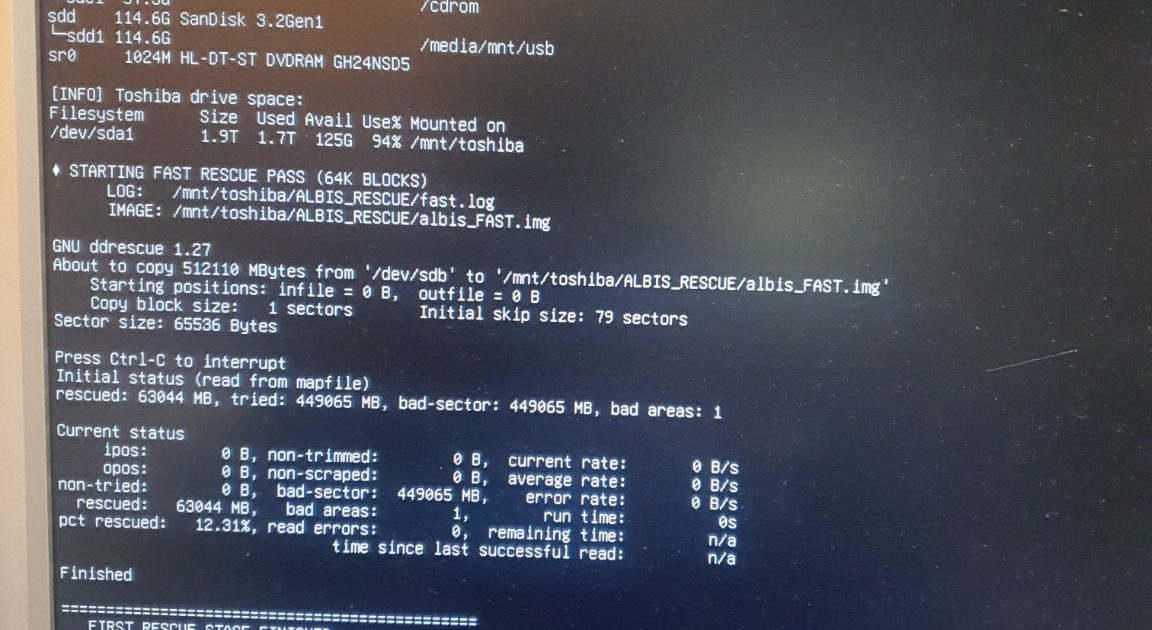
After hours of attempts, reboots, and waiting for the drive to respond, the final report showed:
rescued: 63,044 MB bad areas: 1 rescued percentage: 12.31%
Only 12% rescued sounds bad. But here’s the thing: the ALBIS installation was sitting inside those readable sectors. We didn’t need Windows. We didn’t need to mount the failing drive anymore. We had a complete image file captured at the block level.
The dying SSD could now be disconnected and safely ignored.
Extracting the Database
Everything now existed in a single file:
/mnt/toshiba/ALBIS_RESCUE/albis_FAST.img
This image file was our virtual drive. Attempts to mount it normally failed because the filesystem metadata was corrupted. Expected, given the drive’s condition.
So I used a different approach: forensic file carving with PhotoRec.
PhotoRec ignores the filesystem entirely. It scans raw bytes and extracts files by their signatures. It works even when partition tables are missing, filesystems are corrupted, or directory structures are destroyed.
I launched PhotoRec against the image file:
photorec /cmd albis_FAST.img options,search
Files started appearing. ALBIS database files with .FDB and .GDB extensions surfaced from the raw data. Thousands of recoverable files were carved into a recovery folder.
The moment the first patient database file appeared intact, I knew we had won.
The Outcome
What started as a dead medical PC with a frozen SSD and no backups ended with a complete forensic image safely stored on working hardware, the ALBIS database successfully recovered, and no further need to touch the failing drive.
The clinic’s patient records were saved, pulled sector by sector from dying hardware.
What I Learned
Never work directly on a failing disk. Make an image first, always. Even if it takes hours, even if the drive is barely responding, get that image before attempting any recovery work.
ddrescue is the gold standard for this work. It saves everything that can still be read without guessing or taking shortcuts.
File carving works even on severely damaged disks. PhotoRec doesn’t care about broken filesystems or corrupted directories. It finds files by their content signatures.
Medical software must be backed up regularly. This should be obvious, but clearly it often isn’t. Daily backups should be non-negotiable for systems holding patient data.
Persistence matters. Every reboot, every retry, every freeze that I waited out added more rescued data to the log file. Giving up early would have meant losing everything.
Final Thoughts
This rescue operation was part disk forensics, part puzzle solving, part patience test. When the database files finally appeared in the recovery folder, the relief was overwhelming.
The drive died. The data didn’t. For a data recovery story, that’s as happy as endings get.
About: I’m a CS student in Germany who occasionally gets pulled into real-world tech disasters. More at redouan.net.